1. Introduction
Deploying software to multiple workstations in an enterprise can be time and effort consuming. Using automatic deployment tools can optimize this process. We will use MAPILab Mail Merge Toolkit as an example to show the most common (as we see it) modern ways of installing the product on multiple workstations:
- Mass deployment using MSI file and Group Policy.
- On-premises package deployment tools such as System Center Configuration Manager (Endpoint Configuration Manager) from Microsoft or from a third-party vendor such as Ivanti Endpoint Manager, ManageEngine Endpoint Central, and others.
- Cloud-based package deployment tools like Microsoft Intune or third-party alternatives.
- OS image preparation for virtual desktop environments like Azure Virtual Desktop.
Table of contents:
- 1. Introduction
- 2. Deployment Preparation
- 3. Deployment using Group Policy with MSI and MST files
- 4. Microsoft Configuration Manager (ConfigMgr)
- 4.1 General information
- 4.2.1 MSI package installation
- 4.2.2 Setup.exe installation
- 4.3 Testing application deployment
- 5. Deployment using Microsoft Intune
- 6. Operation System Image Preparation
2. Deployment preparation
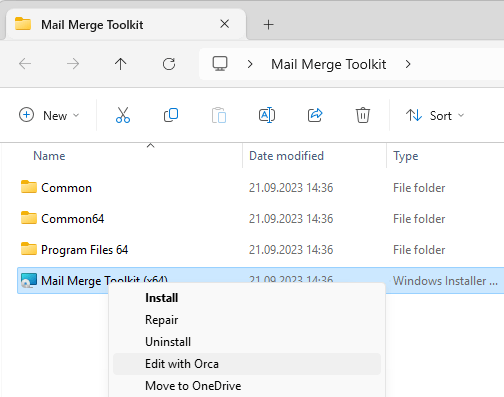
For historical reasons the MAPILab Mail Merge Toolkit main download is still an .exe file, which contains an .msi package inside. Although the .msi package can be extracted from an .exe file,
Setup.exe /s /x /b"C:\temp\mmt" /v"/qn"
NOTE: Make sure the add-in is not installed in the system before running this command.
for convenience we provide direct links to download the latest version of the MAPILab Mail Merge Toolkit package containing the .msi along with its supporting files:
3. Deployment using Group Policy with MSI and MST files
The good old-fashioned way of installing a software package using Active Directory Group Policies still works.
It is not possible to define registration keys or settings for MSI installation packages within the regular GPO interface. However, if it is necessary to add customization parameters to an MSI package, this can be done using MST transformation files. This type of file allows you to modify the default parameters of an MSI package and customize it to meet specific installation requirements.
We will use an MST file to specify the registration key during deployment.
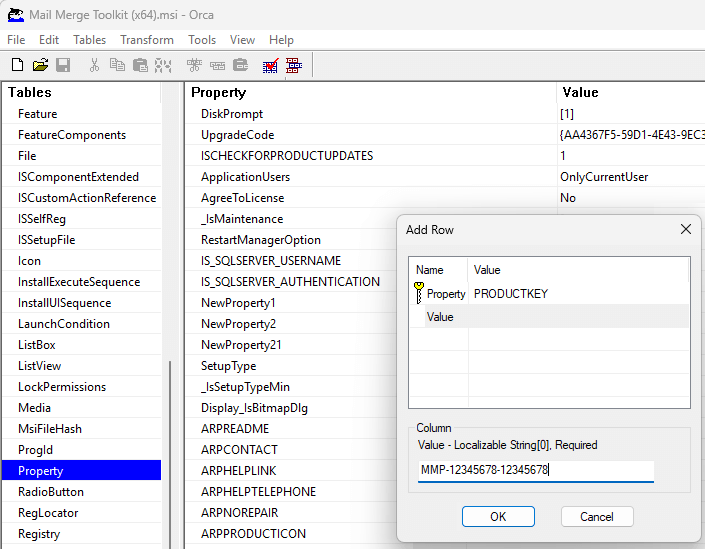
To create an MST file for an MSI package, you can use the ORCA tool (it is a part of Windows Installer SDK).
Open the MSI package using Orca.
Once you have Orca opened, choose Transform – New Transform from the menu.
Navigate to the Property table and add row with property of “PRODUCTKEY” and value of your actual product key, e.g., MMP-12345678-12345678:
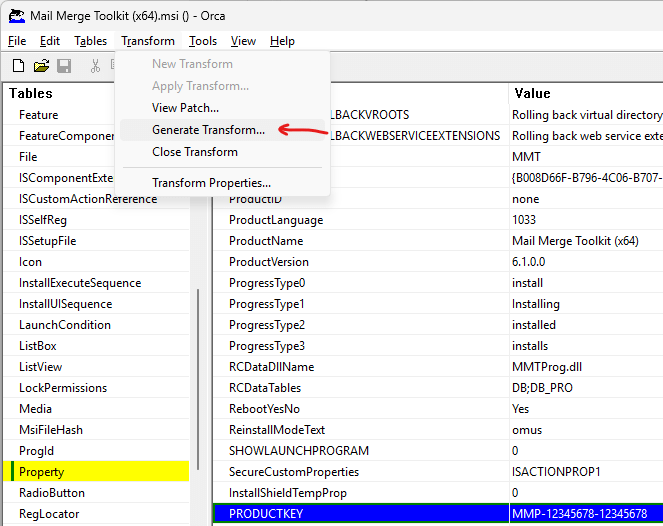
Select Transform – Generate Transform and save the changes as MST file (mmt_mod.mst).
Now you can deploy with MSI and MST files.
The first step in deploying the package through GPO is to create a distribution point on the publishing server. This can be done by following these steps:
- Create a shared network folder (this folder will contain the package files).
- Set permissions on this folder to allow access to the distribution package.
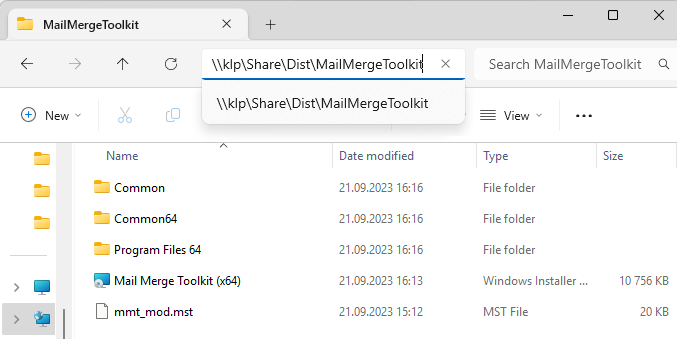
- Copy the .msi, .mst along with other files and folders to the shared folder.
Then create a new domain Group Policy Object to install the software.
Group policy has settings for targeting computers and settings to target users. In this article, we will target computers for deploying software. This means the software will be installed for anyone that logs onto the computer.
Open the domain Group Policy Management console (gpmc.msc).
In the Group Policy Management console browse to the OU, right click and select “Create a GPO in this domain and Link it here…”.
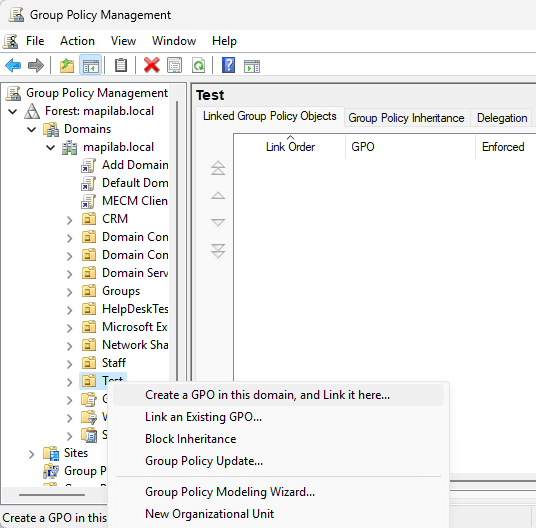
Enter a name for your policy and leave Source Starter GPO as (none).
Edit the GPO and go to Computer Configuration – Policies – Software Settings – Software installation.
Right-click Software Installation and select New – Package.
Select your package from the previously configured network share.
Select Advanced and click OK.
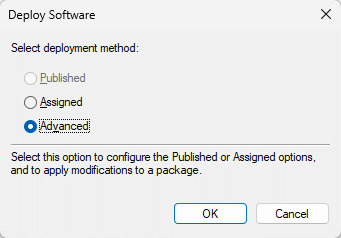
Group Policy offers two methods for distributing software packages:
- Assign – A program can be designated for installation on either a per-user or per-machine basis. When assigned per-user, the program is installed during the user’s login session. Conversely, when assigned per-machine, the program is installed at the machine’s startup, making it available to all users.
- Publish – A program can be made available to one or more users through publication. In this case, the program is included in the Add or Remove Programs list, allowing users to initiate the installation from there.
Switch to the Modifications tab, click Add and select the MST file from the previously configured network share.
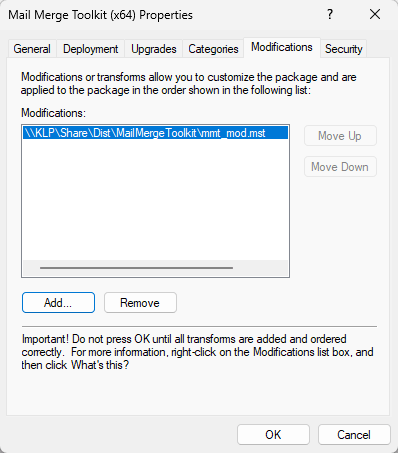
The MST file will now be automatically applied during the MSI installation using the GPO and the application will be installed with the product key.
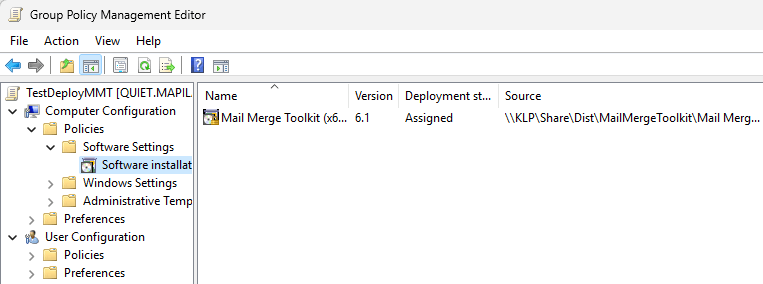
That completes the GPO configuration. The GPO settings should look like this.
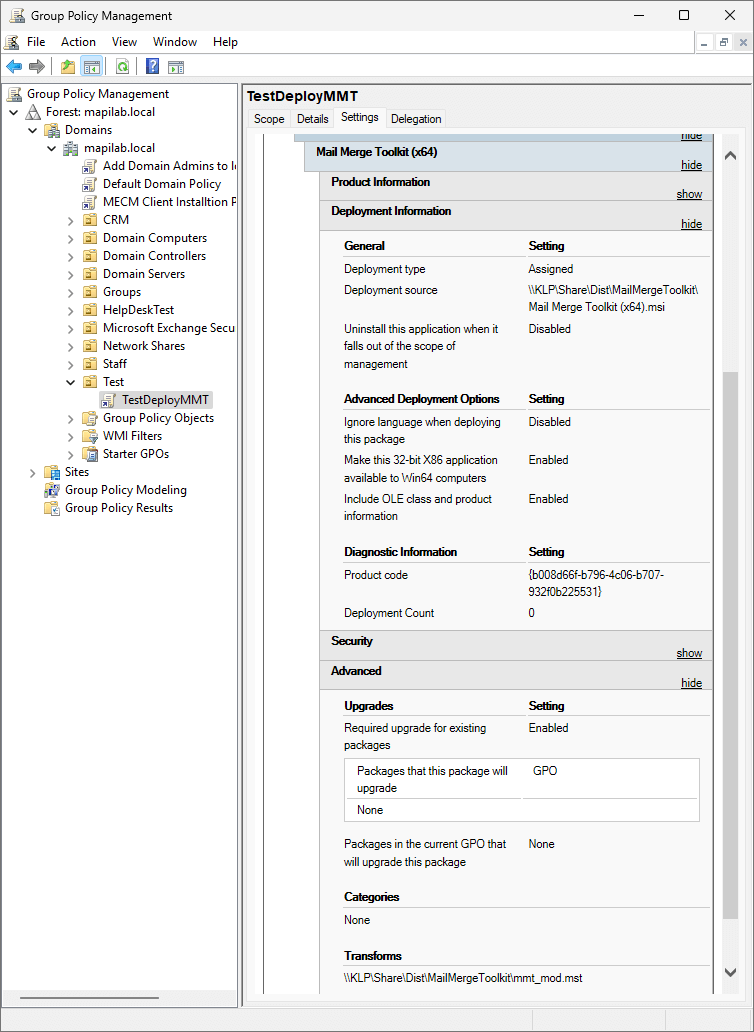
The program is installed only on reboot, and the GPO settings must be updated on the computer. By default, GPO settings are automatically updated every 90 minutes.
To force this process and ensure that the GPO settings are applied immediately, you can use the “gpupdate /force” command.
When you run the gpupdate command, you will be notified that one or more settings need to be processed before the system starts or a user logs on. This message refers to software that is installed using a GPO and is an expected part of the process. Type Y to restart the computer.
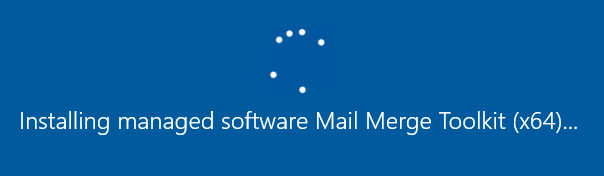
Subsequently, upon rebooting, the software will be installed as intended.
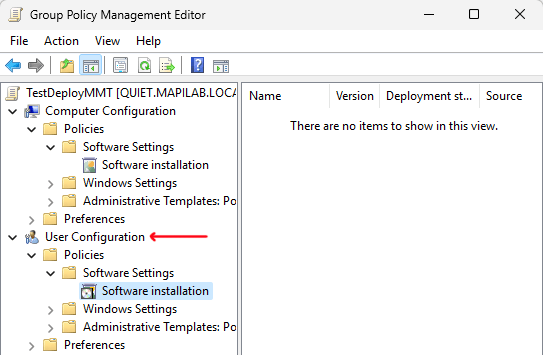
If you want to install software for particular users, just use the user configuration Group Policy Object (GPO) settings rather than those associated with the computer.
4. Microsoft Configuration Manager (ConfigMgr)
4.1 Intruduction
Also known as Microsoft Endpoint Configuration Manager (MECM), System Center Configuration Manager (SCCM) and Systems Management Server (SMS) (Wikipedia).
Microsoft Configuration Manager can deploy applications such as the Mail Merge Toolkit using the Windows Installer package (.msi) or the Setup.exe application. It is also possible to convert an .msi package into a Windows app package (.msix), but this will be covered in a separate article in the future.
Both ways are quite similar, and we will demonstrate how to install the application using each of these options.
Before you start, make sure that the installation files for the Mail Merge Toolkit are in an accessible location on your network (both Setup.exe and .msi with supporting files).
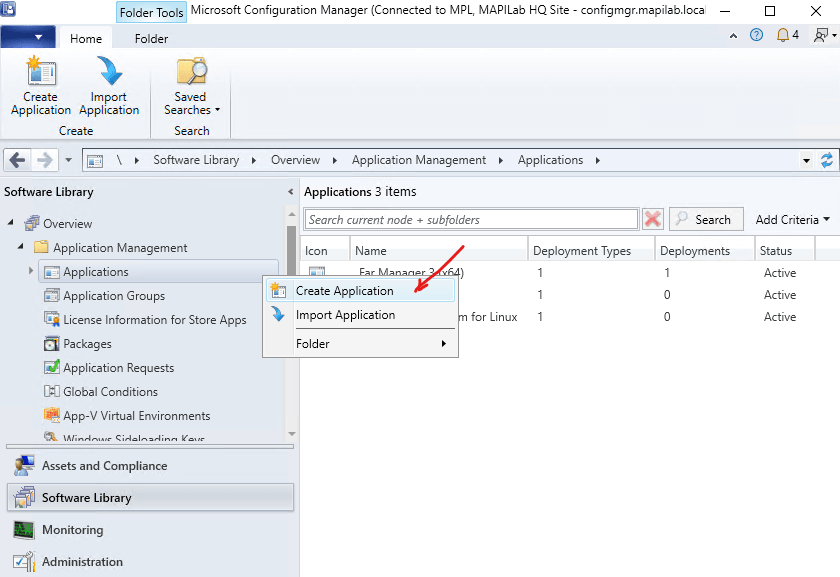
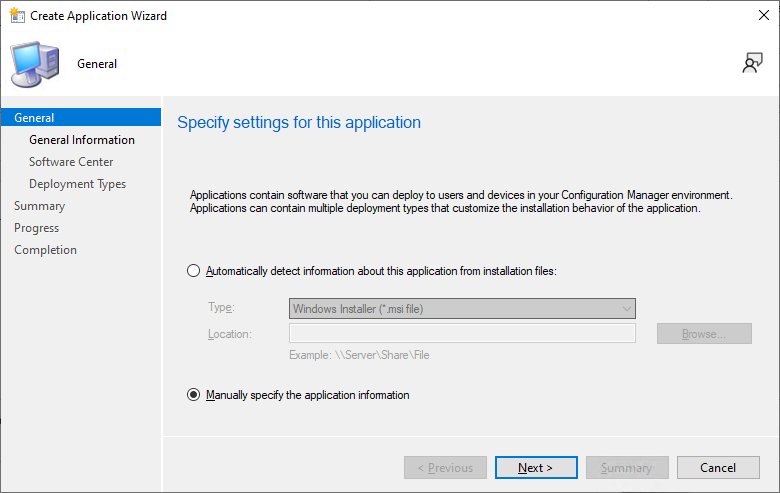
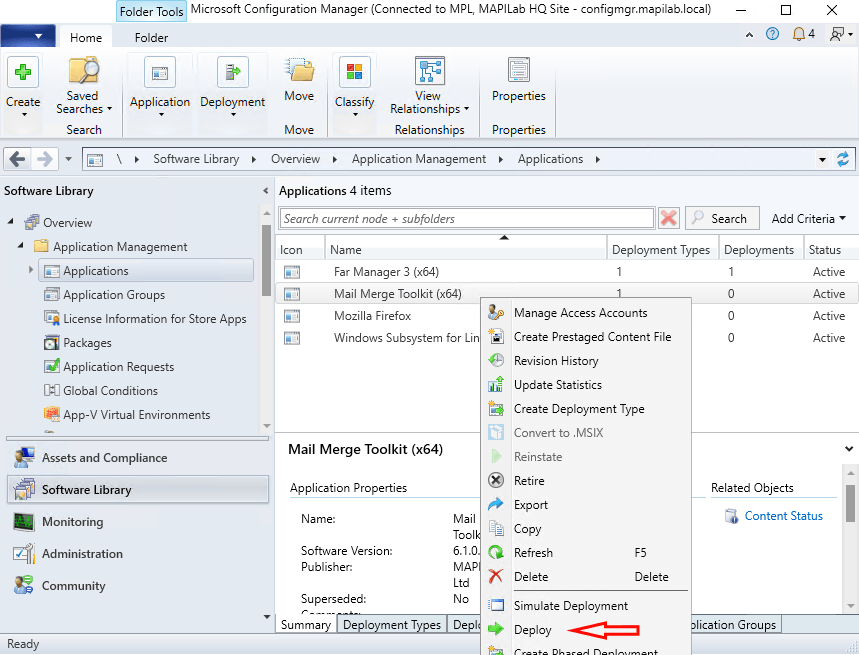
Launch Microsoft Configuration Manager console. Select Software Library, under Application Management select Applications. Right click Applications and select Create Application.
4.2.1 MSI package installation
If you decide to install the .msi package, select Automatically detect information about this application from installation files, specify network path to the .msi file and click Next.

On the Import Information page, you’ll see some information about the app and any associated files that were imported to Configuration Manager. Once you’re done, choose Next again.
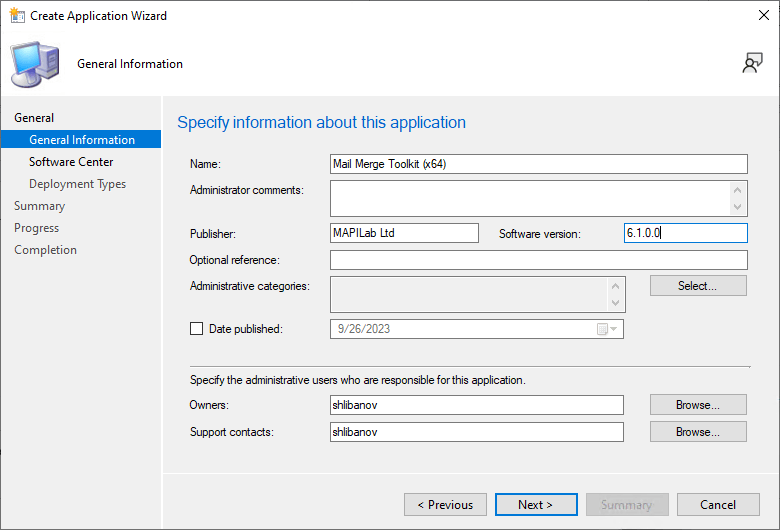
On the General Information page, you can specify details about the software and the Installation program field lets you specify the full command line that will be used to install the application on PCs.
To automatically apply the product key on deployment, specify it as a property on this command line. In addition, let’s add the /qn key for unattended deployment. Thus, the Installation Program field looks as follows:
msiexec /i “Mail Merge Toolkit (x64).msi” PRODUCTKEY=MMP-12345678-12345678 /qn
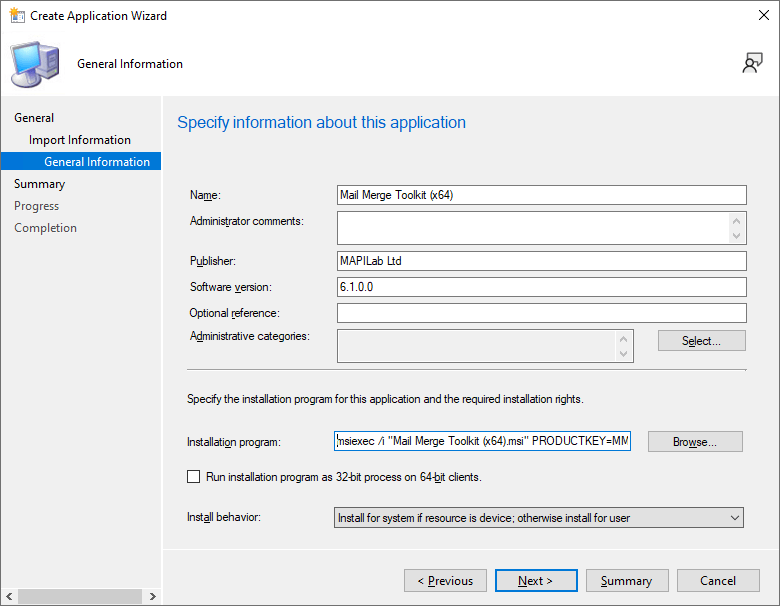
Click Next. On the Summary page, you can confirm your application settings and then complete the wizard.
You’ve finished creating the app.
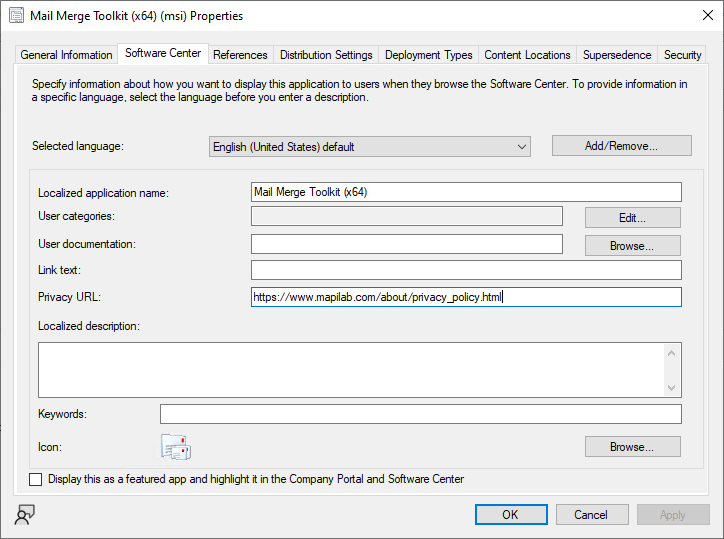
However, additional configuration may be required. Right-click on the application and select Properties.
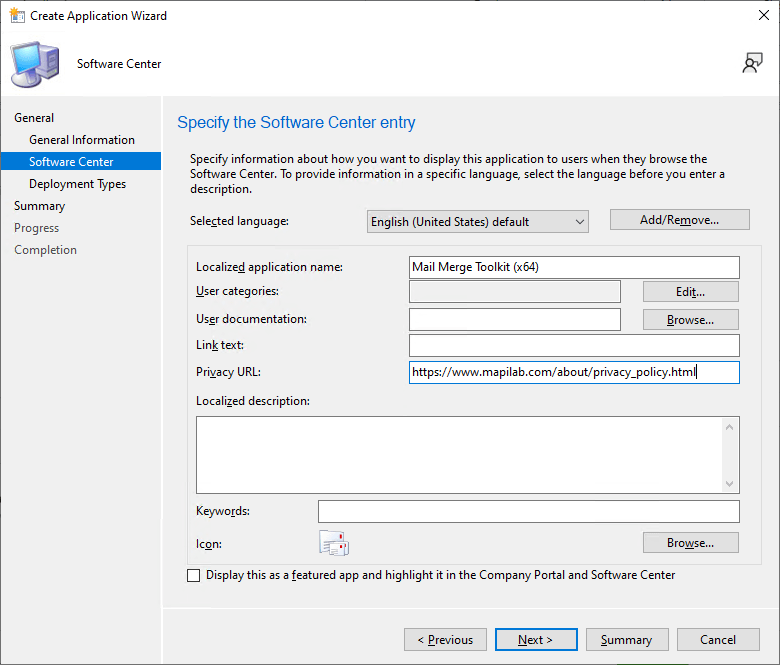
Switch to the Software Center tab. On this tab you can supply further information about the application and change Icon.
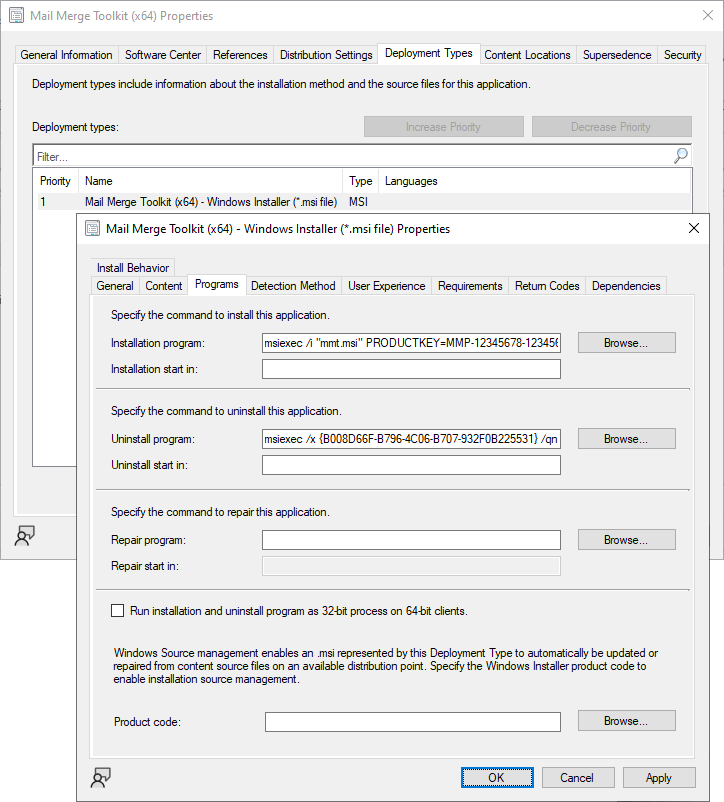
Switch to the Deployment Types tab. Select the automatically created deployment type and click the Edit button.
Switch on the Programs tab. For unattended uninstallation you need to append /qn switch to the Uninstall program field:
Proceed to the next deployment step
4.2.2 Setup.exe installation
If you decide to use Setup.exe, when creating an application choose Manually specify the application information on the first step and click Next.
Specify application Name, Publisher and Version and click Next.
Supply further information about the application, change Icon and click Next.
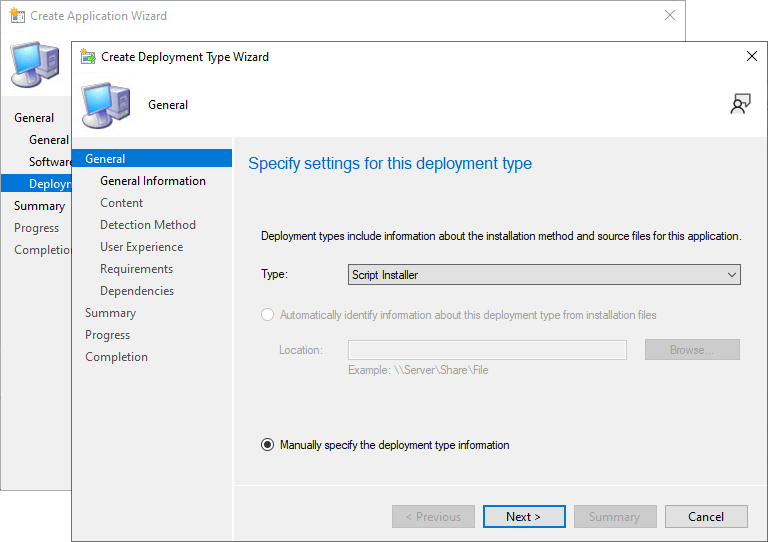
Click Add on the Deployment Types and this will open Create Deployment Type Wizard.
To deploy .EXE file, in Type drop down select Script Installer and click Next.
Provide general information for this installation type and click Next.

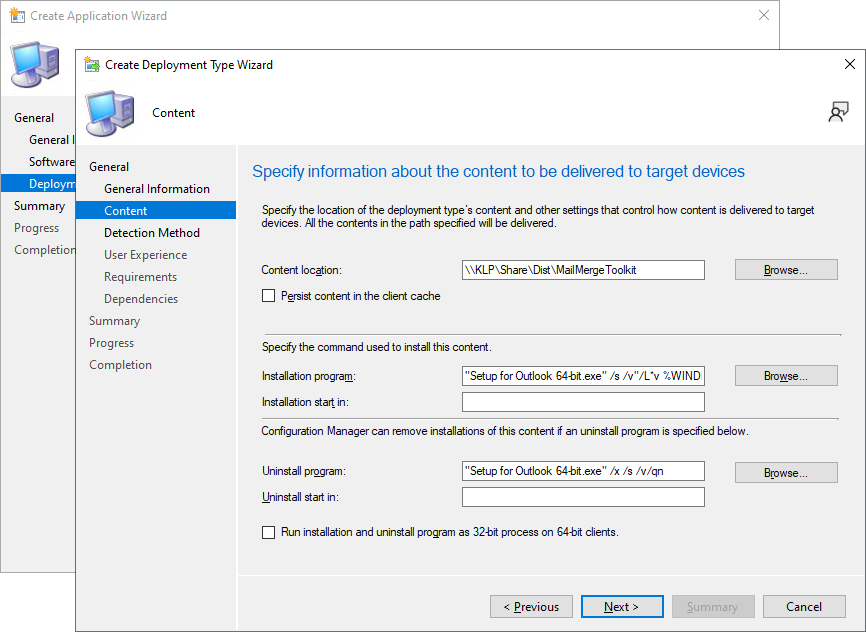
On the Content step specify the following:
- Content location – Path to the shared folder where the Mail Merge Toolkit installation files are located.
- Installation program – “Setup for Outlook 64-bit.exe” /s /v” PRODUCTKEY=MMP-12345678-12345678 /qn”
- Uninstall program – “Setup for Outlook 64-bit.exe” /x /s /v/qn
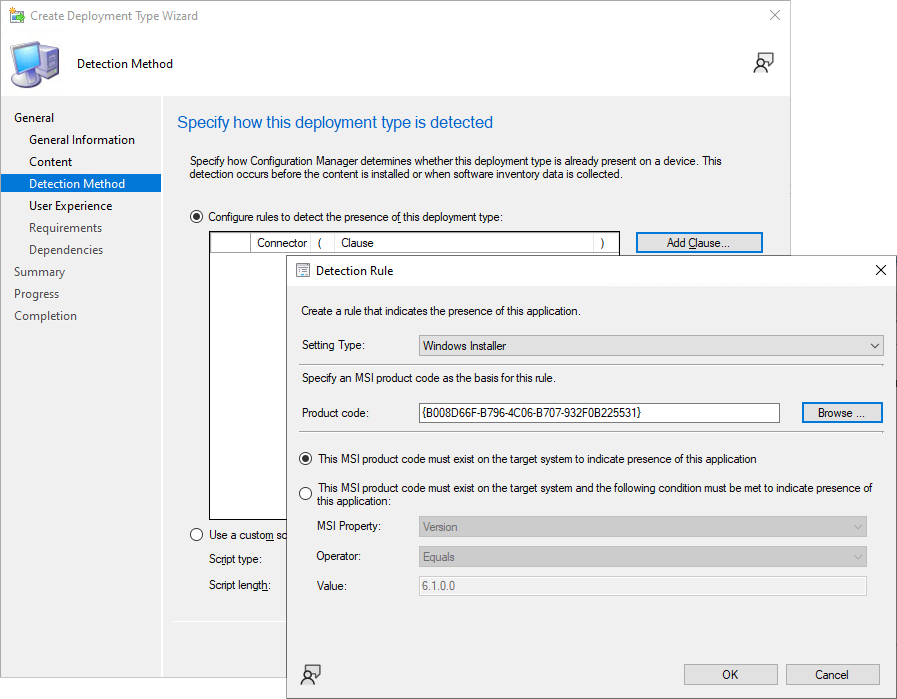
On the Detection Method step click Add Clause.
Since our Setup.exe is a wrapper around the actual .msi, we can set up a rule that uses Windows Installer to determine if the application is installed or not.
To do this choose Windows Installer as a Setting Type and then click Browse.
Find the file “Mail Merge Toolkit (x64).msi” in the shared folder with Mail Merge Toolkit installation files and click Open. This will automatically fill in the Product Code field.
Click OK to create Detection Rule. Click Next on the Crete Deployment Type Wizard.
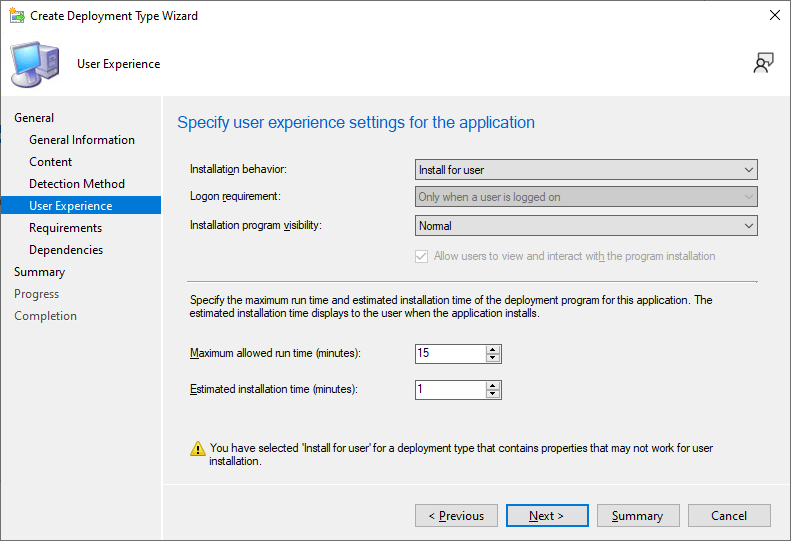
On the User Experience step change Maximum allowed run time (minutes) to 15 and Estimated installation time (minutes) to 1. Click Next.
Click Next on the Requirements step.
On the Dependencies step you can add dependency on Microsoft Office if you have one deployed through Microsoft Configuration Manager.
On the Summary step click Next. You will see a message “The Create Deployment Type Wizard completed successfully”. Click on Close. This will take you back to the Create Application Wizard.
Click Next on the Deployment Types step, then click Next again on the Summary step.
You will see progress and then a message “The task Create Application Wizard completed successfully”. Close the wizard.

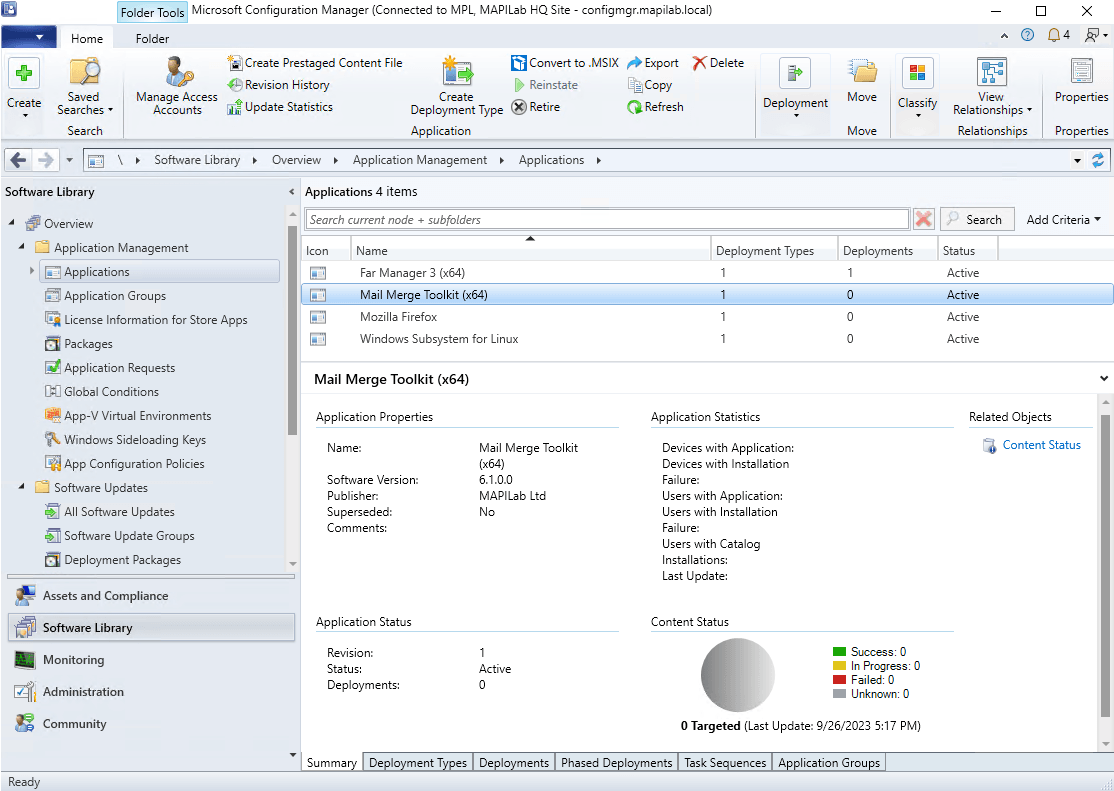
You will see the created application in the Configuration Manager console.
4.3 Testing application deployment
Since we have not deployed this application to any device or collection we see “0” under deployments.
Let’s create a collection of test devices and deploy the application to the computers in the collection.
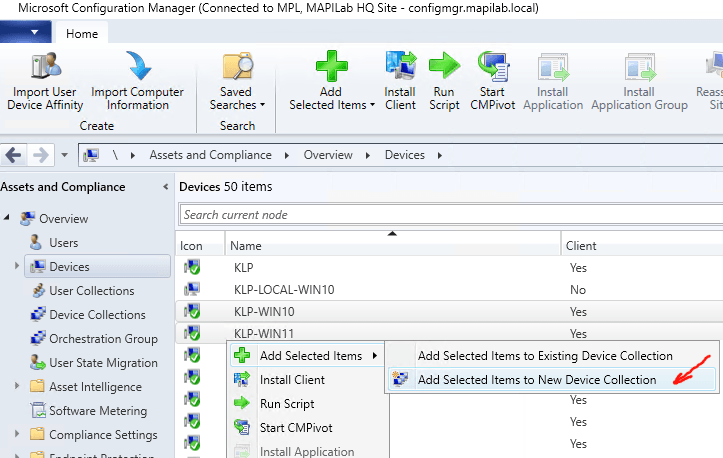
In the Configuration Manager console, go to the Assets and Compliance workspace.
Select the Devices node. Select one or more devices to add to the collection. Right-click on any of them and select Add Selected Items to New Device Collection.
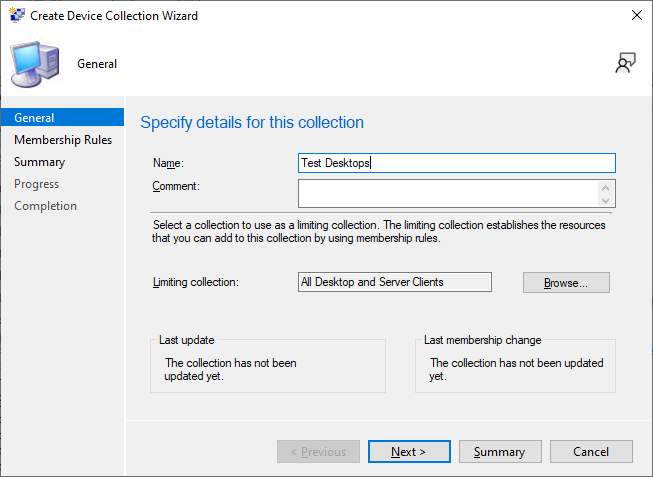
On the General step of the wizard, provide a Name and a Comment. In the Limiting collection section, select Browse, and then select a limiting collection. The collection you’re creating will contain only members from the limiting collection. Click Next.
The Membership Rules step will automatically add your selected devices. Click Next.
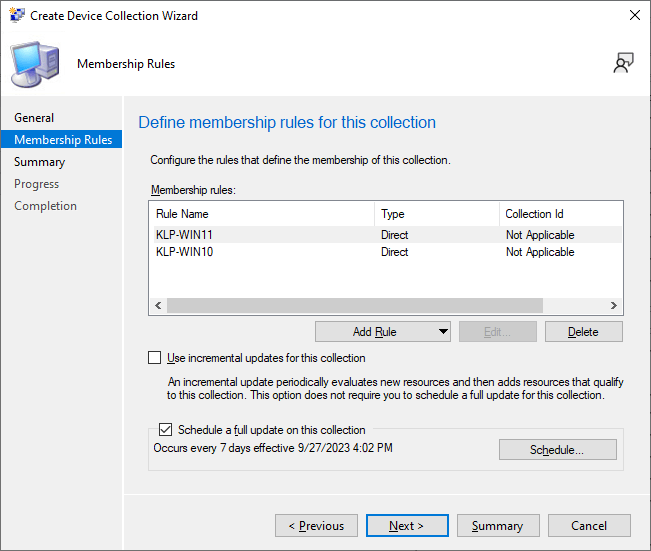
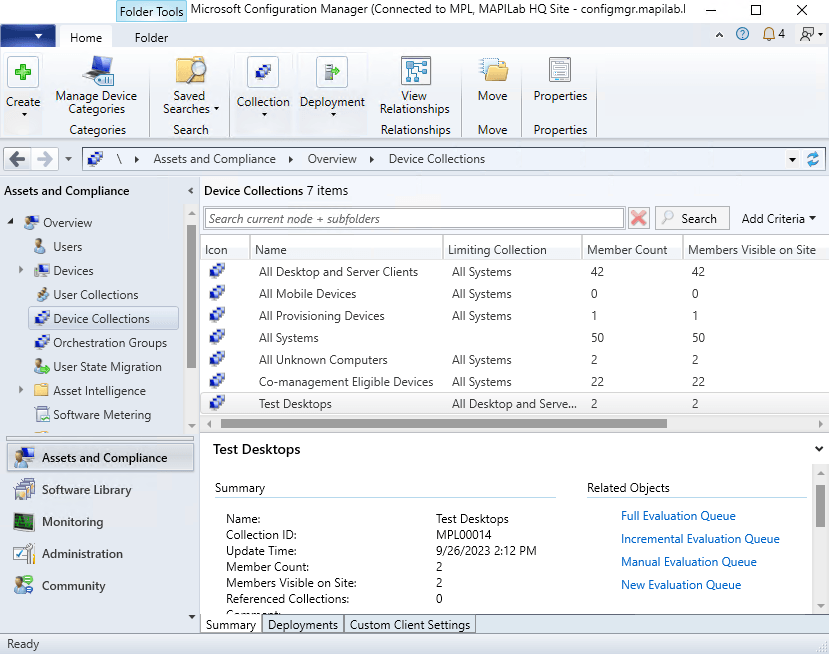
Complete the wizard to create the new collection.
In the Configuration Manager console, go back to the Software Library workspace.
Select Applications node under Application Management.
Right-click the Mail Merge Toolkit (x64) application and select Deploy.
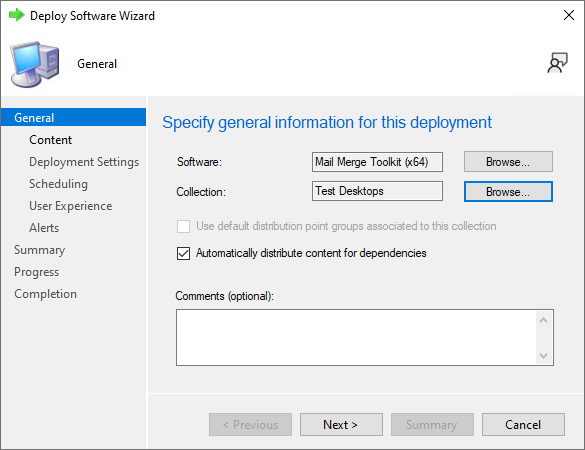
In the Collection field click Browse and select Test Desktops. Click Next.
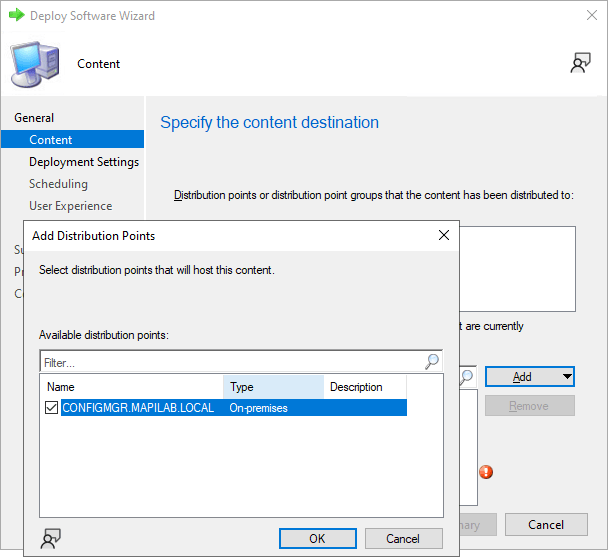
On the Content step of the wizard, click Add and choose your existing distribution point. Click Next.
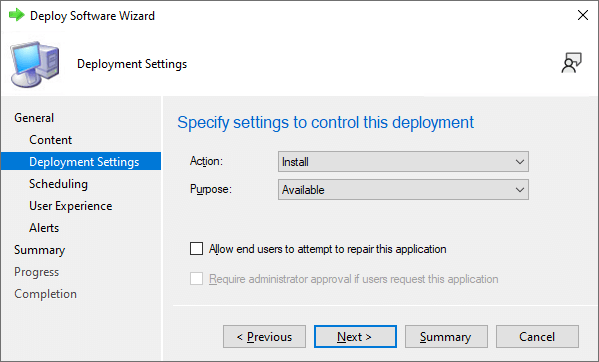
On the Deployment Settings step choose Action as “Install” and Purpose as “Available“.
Leave the default values for options on the Scheduling, User Experience and Alerts steps.
Review the Summary and complete the wizard.
The Deployments value for Mail Merge Toolkit should now be changed to “1” since we have deployed the application to the collection.
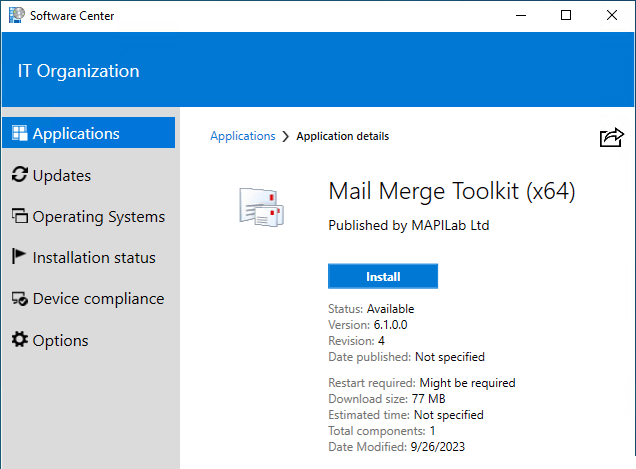
Let’s check if the application has become available in the Software Center for the target computers.
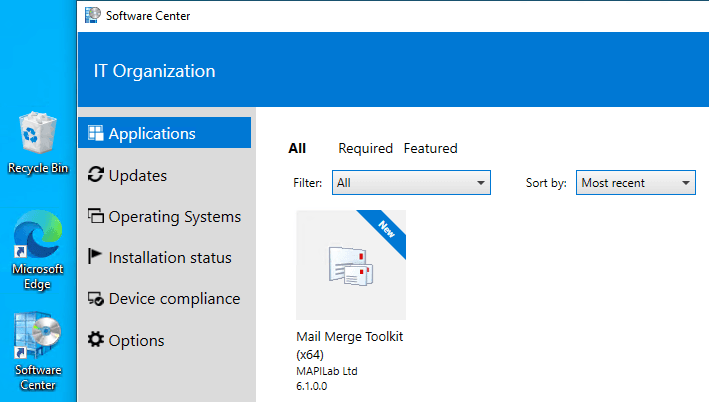
Try installing the product and make sure that once the installation is complete, it becomes registered.
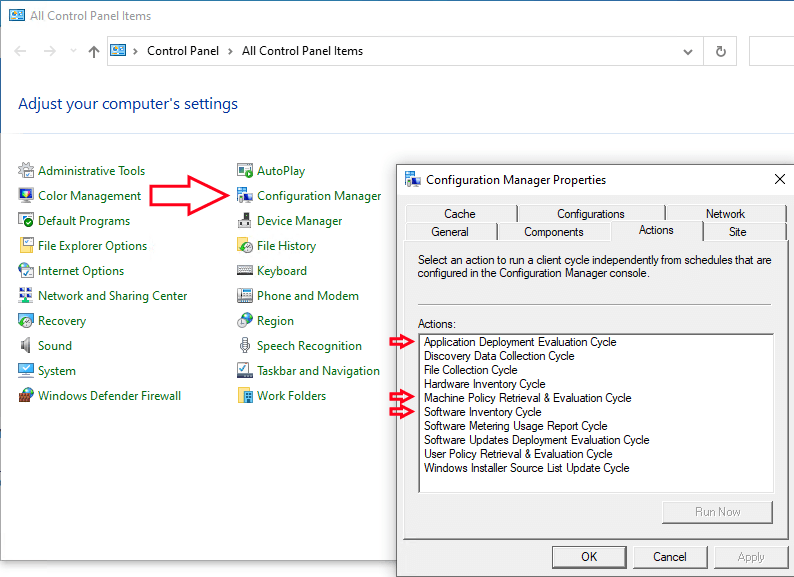
Note: It may take some time for new software to become visible in the Software Center. You can force an update by using the Configuration Manager section in the classic Windows Control Panel.
Select the Actions tab. Select the following actions one by one and click the Run Now button for each:
- Application Deployment Evaluation Cycle
- Machine Policy Retrieval & Evaluation Cycle
- Software Inventory Cycle
5. Deployment using Microsoft Intune
Microsoft Intune is solely cloud-based technology. It is also called the cloud variant of ConfigMgr, but it is not the equivalent of ConfigMgr. As ConfigMgr is a much more powerful tool than Intune (so far).
In Intune, you can deploy applications to a PC as a Line-of-business app (.msi, .appx, .msix) or as a Windows app (Win32) (.intunewin).
Although Mail Merge Toolkit can be deployed by Intune as a LOB app using the .msi package, we recommend using the Windows app (Win32) option using the .intunewin packages available for download at:
The Windows app (Win32) (.intunewin) option provides more control options such as dependencies, delivery optimization, etc.
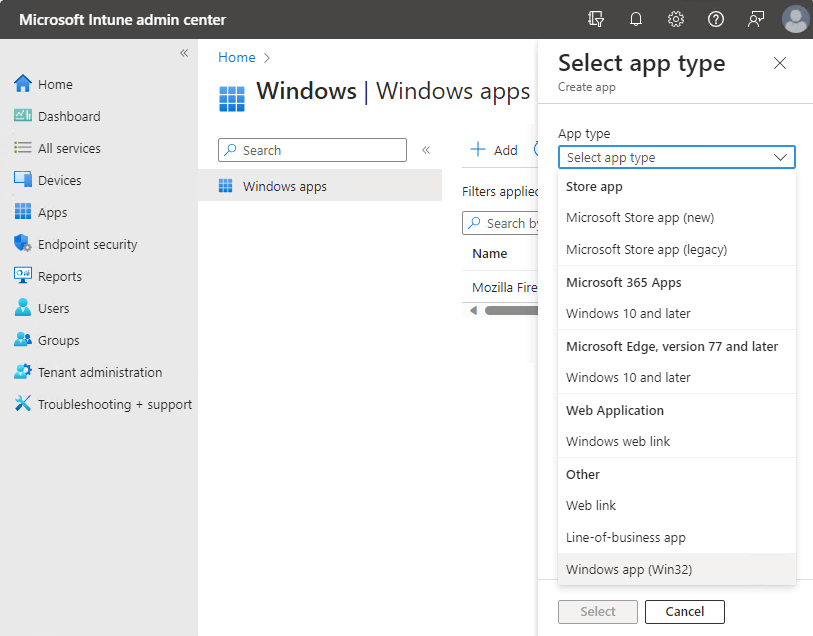
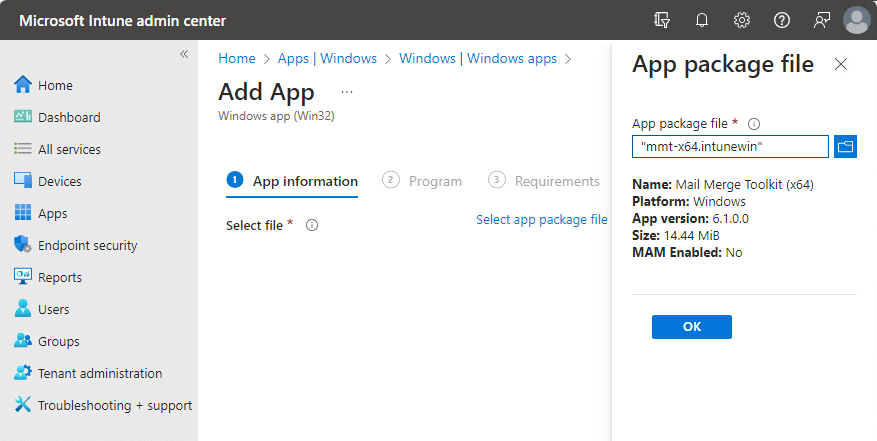
Log in to the Microsoft Intune admin center, select Apps – Windows – Add.
On the Select app type pane, under the Other, select Windows app (Win32) and click Select.
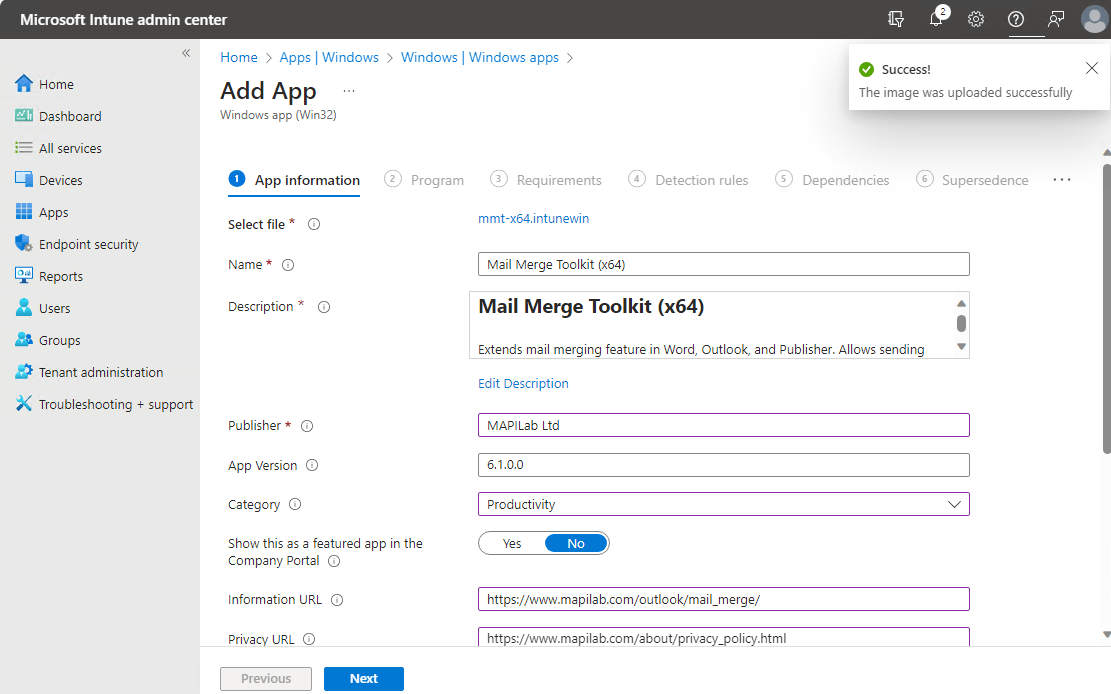
In the App information step, click Select app package file. Click Browse and select the downloaded .intunewin package. Detailed information about the application appears. Click OK.
Provide additional information about the app, such as the Publisher, Description, Category, and Logo. Click Next.
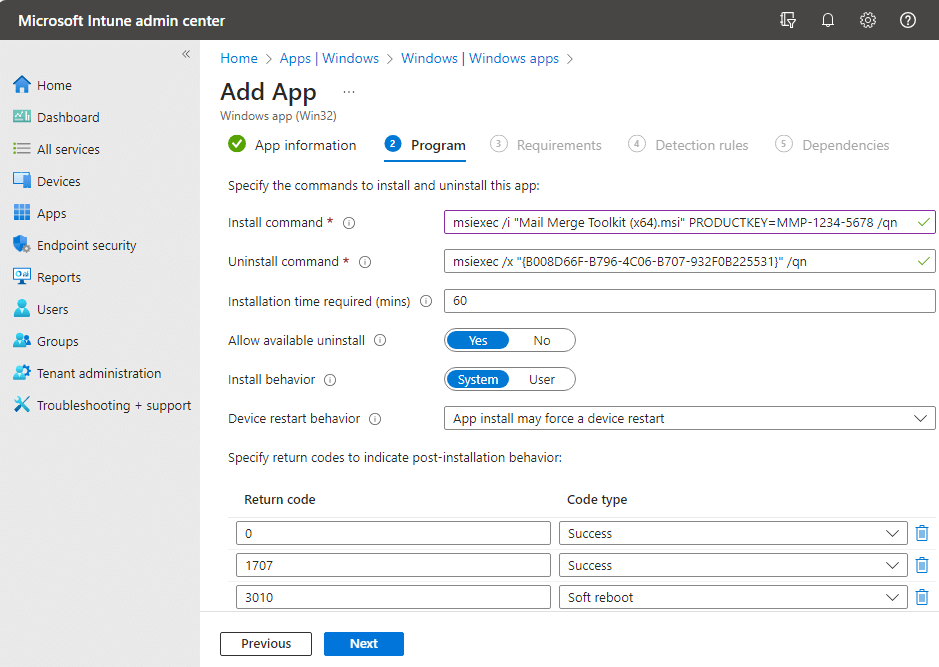
At the Program step, the Install and Uninstall commands are filled in automatically.
To automatically apply the product key during deployment, modify the Install command by adding “PRODUCTKEY=MMP-12345678-12345678” (without quotes) to the command line. Click Next.
Make sure that you are using a valid multi-user product key.
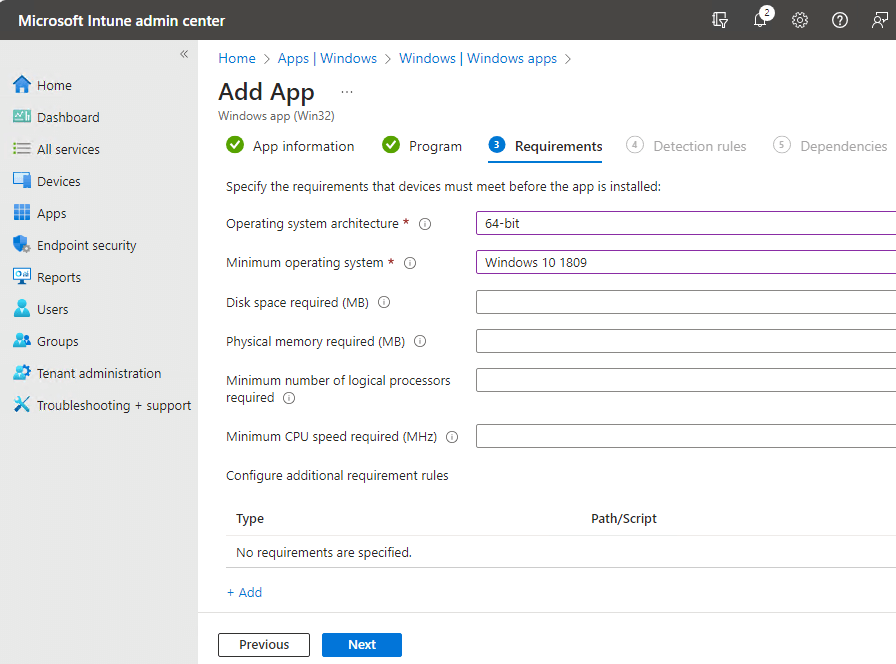
In the Requirements step, specify Operating system architecture and Minimum operating system version and click Next.
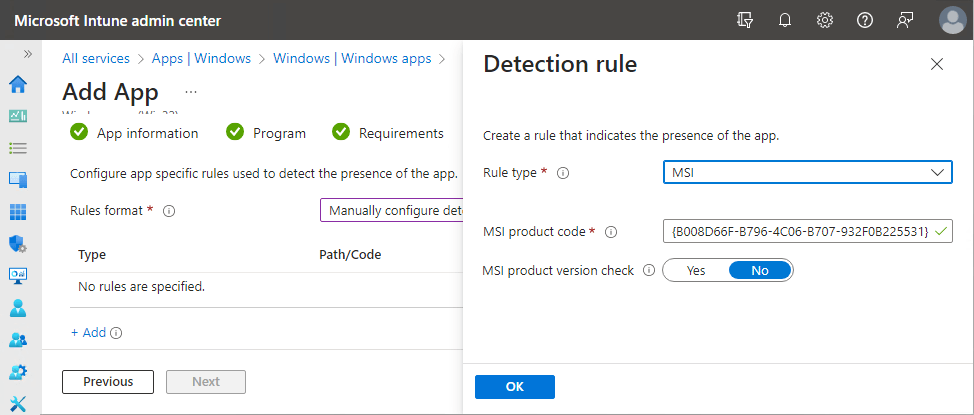
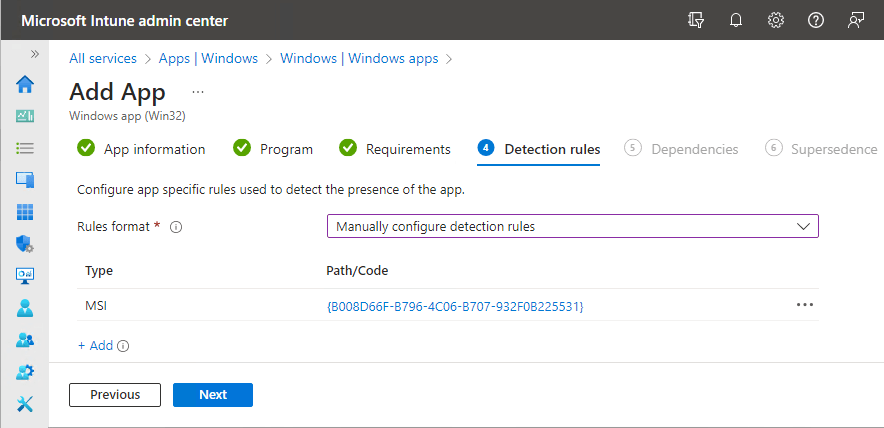
In the Detection rules step, select Manually configure detection rules as the Rules format and click Add.
Select MSI as the Rule type. The MSI Product code will be filled in automatically. Click OK.
Click Next.
On the Dependencies step, click Next.
On the Supersedence step, click Next.
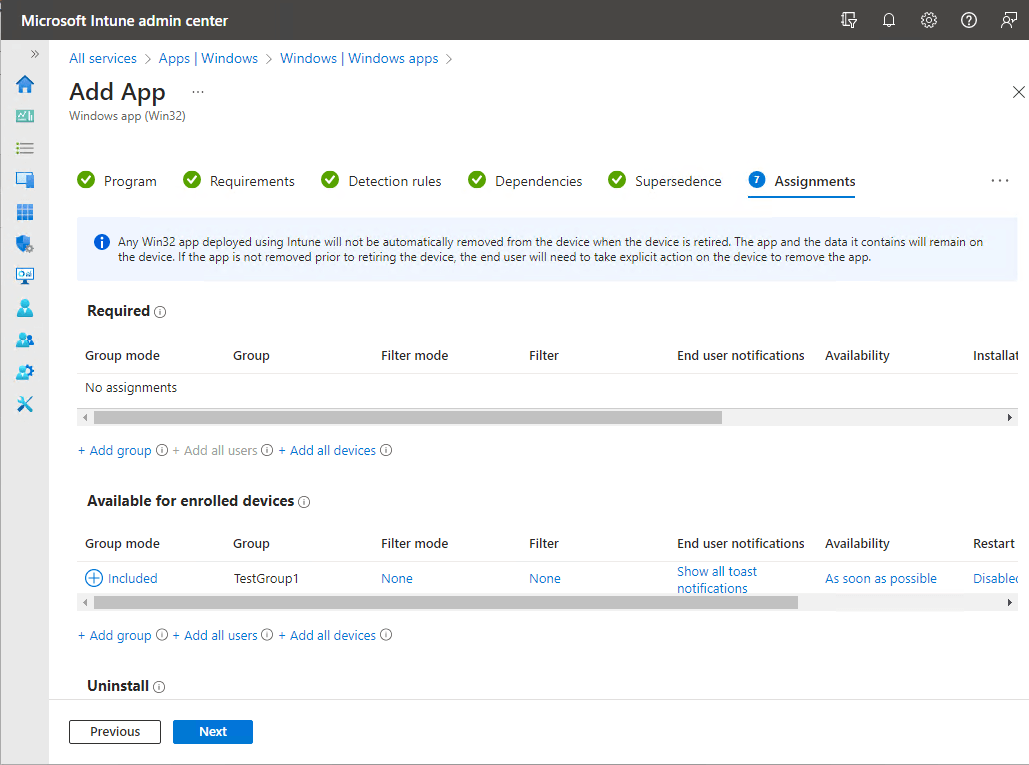
In the Assignments step, under Available for enrolled devices, click Add group.
Select at least one group containing users or devices and click Select. Click Next.
Review the application information and click Create.
After a few minutes, check the Company Portal application on the target computer.
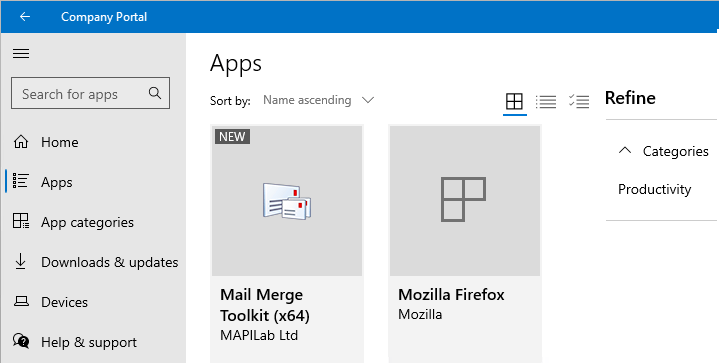
You should see a new application. Select it and try to click the Install button.

After the installation is complete, check to see if the product is registered.
6. Operation System Image Preparation
This is the simplest part of an article. In virtualized desktop environments such as Azure Virtual Desktop, custom software can be included in a so-called “golden image” for session hosts.
There are a number of articles on how to prepare a golden image, e.g. : https://learn.microsoft.com/en-us/azure/virtual-desktop/set-up-golden-image
They all include the step of installing custom software.
In the case of Mail Marge Toolkit, you need to install the software either using a regular installer and enter the product key or run the installation from the command line with the product key.
"Setup for Outlook 64-bit.exe" /s /v"ALLUSERS=1 PRODUCTKEY=MMP-12345678-12345678 /qn"
Once the installation is complete, you can proceed with taking the final snapshot and running Sysprep.