As you may know, the latest installment of the Microsoft’s globally acclaimed office productivity solution – Office 2013 – has many differences from the previous one, and the list is increasing even as we speak owing to frequent updates. While most of the changes are quite expected: feature upgrades, fixes and new feature implementations; there are some that came as a surprise.
To improve the overall security measures regarding Office and Windows system stability, Microsoft decided to remove the possibility of implementing a so-called “custom action” Outlook rule configuration scenario. Basic Outlook rules, an all-powerful tool created to achieve the broadest of goals as far as scope and in terms of improving one’s Outlook and Office experience, were left intact. However, the removal of the “custom action” function naturally restricts some rule configuration scenarios.
In this article, we will not discuss any scenario that was dependent on the “custom action” feature, but rather will describe one which was responsible for automatically printing out messages and attachments by a tool of our own making: the third party add-in called the MAPILab Print Tools for Outlook. This product extends the way uses are able to print out messages in Outlook, while also allowing them to conveniently and seamlessly print out attachments of literally any kind and file format (rather than complicating things by managing each file type internally, the add-in calls for a “Print” command of the application which Windows system uses to process and print this or other file type; for example, Adobe Reader’s “Print” command is used to print a .PDF file, etc.), while doing so automatically with little or no input required from the user (depending on a task at hand).
Like many other third-party tools and a proficient user’s own scenarios, the add-in relied, on the “custom action” feature of the Outlook rules in previous installments of Microsoft Office. In its basic form, the custom action is a way for an external script to interact with an Outlook rule. Print Tools for Outlook was then specified as a custom action to be applied to messages meeting defined conditions. For example, when a message with a certain subject line or an attachment of a specified file type arrives in a certain folder, a custom action is performed which grants the add-in permission to monitor for a condition while residing in Outlook and eventually printing out the item, without the user’s further interaction. This, along with many other possibilities, is no longer possible in Outlook 2013 due to security matters (a malicious program could gain access to critical Outlook data via the custom action feature).
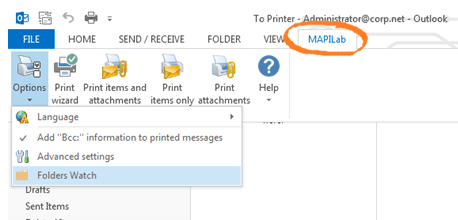
However, we at MAPILab have implemented a convenient workaround in order to make the automatic printing feature available in Outlook 2013 without relying on the custom action: we called it the Folders Watch. The Folders Watch is a new feature, unique to Outlook 2013 in terms of its user interface. While somewhat limited in comparison to the Print Tools for Outlook operation in the previous Microsoft Office editions (2003, 2007, 2010), it does allow a user to print his/her items just the same by specifying a folder from the user’s mailbox folder list, including Calendar, Contacts, Notes, and other item folders.
And here is the fun part: despite all the changes made to sacrifice the customizability for improved security, you can still use all the might of Outlook rules to produce any kind of auto-printing scenario for the add-in!
Using a standard set of the triggers you can, for example, reduce the criteria for incoming messages by sender type or by attachment file format. This is done by creating (or designating among the already existing ones) a folder that will be used for the filtered items which, in turn, will be used by the Folders Watch feature to collect the items for printing it via the add-in.
Let us imagine the following scenario. The main point of interest will be a folder (or a number of folders), where all the filtered items will end up being stored for automatic printing. This is the folder which we will later select as the one to be monitored by the Print Tools for Outlook Folders Watch feature.
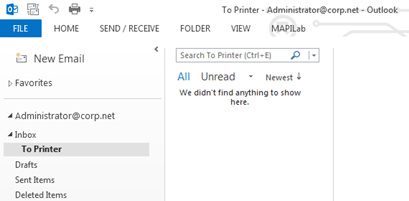
For the sake of better demonstrating the scenario, we will create such a folder, although you can select one from the existing ones. Depending on the type of your preferences, you can create/select different kinds of folders, including the aforementioned Contact/Task/Note for the respective items to be later printed. But for this example we will demonstrate the filtering of e-mail messages and attachments, therefore we have created a folder named “To Printer”, which is a basic Outlook message folder with no special content attributes:
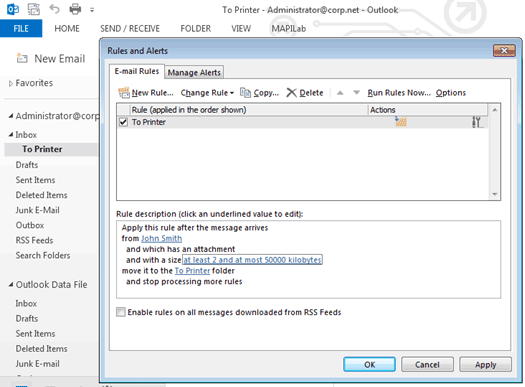
Now it is time to begin customizing your filtering scenario by applying some Outlook rules! Basically, these can make any message or message with an attachment appear in this new folder to be printed automatically. You can set the range of conforming messages as precise as you desire – the filtering rules are potent enough to even restrict the messages by just an internet domain, or by use of the sender’s name, full address, a message subject or an attached content type. You can even choose a particular attachment type to be sorted out and sent to the Folders Watch–designated folder, so you can be assured that only the messages and/or files that you are certain you want to be automatically printed will appear in this folder.
For our example, we have chosen to restrict the filtering to messages with an attachment, larger than 2 kilobytes in size, and sent from a specific user only:
When you have determined what messages you wish to print automatically and which you want to be left outside of the filtering scope, you can apply the rule and initiate testing procedures. In essence, you have established a fully-automated printing scenario for any messages and attachments that the Outlook rules send to the designated folder. They will be moved or copied to that folder and the Print Tools for Outlook add-in using its Folders Watch feature will simply print without any further user input, calling the application that is responsible for managing the given file type. That application is what sends the file to your main printer’s queue.
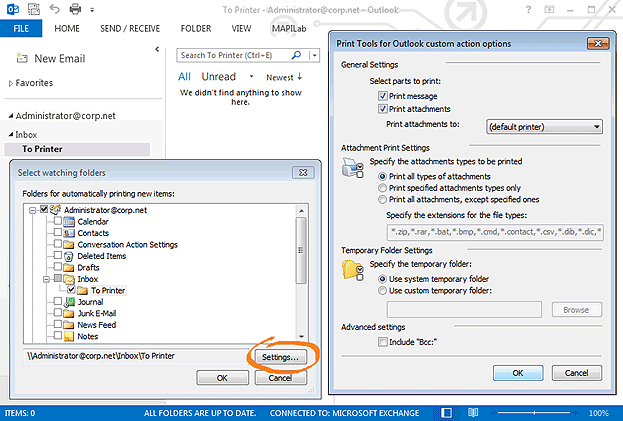
Note that the add-in itself also has a wide array of options and settings, as well as its own filtering rules. For example, since you have the ability to set multiple folders in the Folders Watch feature, a unique set of filters in the form of which item to print (a message, an attachment, or both) and to which printer to send the item could be applied to each selected folder – simply select it within the Folders Watch folder list and click “Settings…”:
There are also global settings that will be used by default if you do not change the unique folder settings in Folders Watch. These are set by clicking the “Options” button of the add-in’s Outlook ribbon interface.
Also note that this was just a basic scenario – the possibilities of filtering the messages and file attachments are virtually limitless with Outlook rules, and you can fine-tune which ones will be automatically printed, and which will not, to an extent limited only by your own desire and the task at hand.


Is there a scenario possible that I activate the watch folder option for the Inboxes of 3 or more shared folders inboxes. As soon as a new message appears there it will print the attachments, or is the programm always depending on a certain rule ? Of course that is also not a problem, but it would be nicer if we could directly print when something comes into the inbox.
Hello Maarten, thank you for your question. Inboxes are folders as well – so, you can configure rules for each Inbox folder with Folders Watch just the same way, like described in this post.
We downloaded the free trial to print attachments in Outlook. I have set up the rule and identified the folder to watch but when new emails come into that folder nothing is printing. We’ve set it up to print all attachments and have identified the printer that should be used. What could be causing it not to print?
Hello, this is a common situation when a network printer is used to print the attachments in this scenario. If you have a network printer – please see the IP address in the current settings of your network printer, and add a new printer instance as follows:
If the problem is not resolved – please create a dedicated trouble ticket in our Technical Support module, and we will assist you with resolving it.
Hello Brooke, please check first your rule settings – there are different ones: the general settings (available when you click on Options) will be applied to your actions with add-in options; and the specific rule settings are available when you 1) select the folder and and put the checkmark to its chelbox, 2) click on “Settings” while the folder is selected in the list. Please check them.
When I send a job to a folder that is being watched, 2 print jobs are send instead of 1. Is there a way I can fix this?
Please check your regular Outlook “Print Options” settings (Outlook > File > Print). If the setting “Print attached files…” is active, the attachments may also end up being printed by Outlook every time you use the add-in to print something.
Is it possible to use your software to setup multiple rules for printing?
The emails I want to automatically print have 2 attachments:1 which needs to be printed to a different tray of the same printer as the second attachment. I was hoping i could setup 2 different rules:
1. Autoprints the first attachment to selected printer settings and excludes the second (by a word in the filename)
2. Another rule which autoprints the second attachment to another tray (different printer settings) and excludes the first attachment (based on a word in the filename).
Yes, this scenario is possible on the condition that you’d be able to configure an Outlook rule that would copy such a message into separate folders. The add-in relies on Outlook rules, serving as an action trigger in terms of automatic printing, and the boundaries of its possibilities are limited by the said rules. Moreover, the add-in would not detect/process a single message twice when it hits the Inbox folder in Automatic mode.
You can evaluate a free trial version at https://www.mapilab.com/outlook/print_tools/
Hello Ashleigh, thank you for your question.
Yes, you can configure multiple rules for printing: with Outlook 2002-2010, you can use the regular Outlook rules (with all their filters) for your Inbox and select Print Tools as the rule custom action.
For Outlook 2013-2016, and for the folders other than Inbox, you can configure the Folders Watch component of our Print Tools: it works with the selected folder, and filtering by file type is supported as well. So, you could create a second folder for your messages – and configure an Outlook rule for copying your specific messages to that folder. Then, please configure 2 rules in Folders Watch for those two folders: the first one will print your 1st attached file to your 1st selected printer – from the 1st email folder, the second one will print your 2nd file to the 2nd printer – from the 2nd email folder.
Hello, I just got updated to Outlook 2013 and followed the instructions and it seems to be working but every now and then I get an error message:
Error: “Unknown error 0x8004010F
Description: ” The client operation failed.”
“Microsoft Exchange Information Store”
File: MMAPIStore.cpp
Line: 31
Method: CMMAPIStore::openMessage
Any direction on this would be great. Thank you!
Hello, Please consider using our Support Area to create a dedicated trouble ticket, where we would be able to troubleshoot the problem properly.
The “0x8004010F” error code indicates an issue with access to the mail store (folder, or item).
If your user uses an Exchange account with cached mode – you will probably need to refresh his mailbox cached copy (OST file): https://support.microsoft.com/en-us/office/repair-outlook-data-files-pst-and-ost-25663bc3-11ec-4412-86c4-60458afc5253?ui=en-us&rs=en-us&ad=us
Or your mail profile may contain a corrupted folder tree.
If repairing OST file does not help, please try to create a new mail profile (Start-> Control Panel-> Mail) and configure the mailbox there:
https://support.microsoft.com/en-us/office/create-an-outlook-profile-f544c1ba-3352-4b3b-be0b-8d42a540459d?ui=en-us&rs=en-us&ad=us
If the issue will persist afterward – we look forward to your reply in the Trouble Ticket system and will assist you further.
after it prints the item can i have it make the message marked as Read.
Hello Tim, Thank you for your question. You can configure to mark your message as Read after printing, if you use Outlook 2003-2010, and select Print Tools as a custom action in the regular Outlook rule settings.
If you use Print Tools Folders Watch in Outlook 2013, that action is unfortunately unavailable.
Hi Jon,
Folders Watch component does not support IMAP folders, but all other Print Tools options do.
And you can use them to print your attachments, e.g.:
1) select messages in your folder, then click “Print Attachments” on the ribbon – and attachments from your selected messages will be printed;
2) select messages in your folder, then click “Print Wizard” on the ribbon – and proceed with the settings;
3) select messages in your folder, then right-click on a selected message, and select either “Print Attachments” from the context menu;
4) select your folder, then select click “Print Wizard” on the ribbon, and select the range of your messages in the current folder to print files attached to those messages.
Hello Jon, thank you for your question.
What is the type of those mail folders? – are they from a PST, or from an Exchange mailbox (personal or public), or from an IMAP mailbox ? (Please note that IMAP folders are not supported in Folders Watch).
Could you please create request in our Trouble Ticket system, and attach there the screenshot showing your folder tree in the Folders Watch menu, and also tell us more details about your account types in Outlook?
Hi, the mailboxes are IMAP. Does this mean i would have to manually print the attachments?
How do I get my “to printer” folder in the folders watch every time I click on it there is no option to add the folder into watch
Hello Jim, to configure Folders Watch for the selected folder, please hit “Settings” – and you will see the new dialogue, “Print Tools for Outlook custom action Options”, like in the last screenshot ih this article. Please see there drop-down printer selection with “Print Attachments to” – in the screenshot, “Default printer” is selected, but you will see all your available system printers in the drop-down list as well. Folders Watch saves a single rule for severy single selected mail folder, and your printer selection will be saved in every rule separately.
I have multiple mailboxes connected to my outlook 2013. I need to have different mailboxes print to different printers. So far, when I change the “settings” on the folder watch – I have be unable to make received attachments in different mailboxes print to different printers. I could do this on older versions of outlook. How can I fix this?