There is an astonishing number of ways one can use Microsoft Outlook for performing daily tasks, whether at home or at the office. From the developer’s side, great care must be taken to made sure that the tool is as convenient and user-friendly as possible, going far beyond improving user interface in a new major edition and adding, – for instance, automation scripts (known as configurable “Rules”) to broaden the scope of time-saving scenarios.
However, despite the considerable measures taken to enrich Office applications with such features, the increasing complexity of daily tasks makes it inevitable that a new scenario – not covered by Office automation features – turns up every once in a while.
Microsoft has addressed this “shortcoming” by introducing COM Add-ins – an ever-present (starting in Office 2000) software layer that allows users to install their own automation features in the form of third-party programs called “add-ins”. This allowed Microsoft itself to concentrate its resources on developing and maintaining core Office functionality.
One good example of an automation scenario made possible by a third-party add-in is automatic sending of recurring mail. The need for this feature is not hard to imagine at all: many common tasks that are performed primarily in Microsoft Office could require that one or two similar email messages be sent on a regular basis. Pay day notifications, advertisements, and follow-up emails are just a few of the obvious example to mind. Not only does this ensure the regular sending of such email, but it adds the benefit of sending messages without even needing to be in front of the actual computer – an advantage many Office users have long dreamed about.
One easy method of sending recurring email messages is via the Email Scheduler and Task Email Scheduler add-ins by MAPILab – a renowned third-party add-in developer tracing its history nearly to the inception of the Office COM Add-Ins market. Both add-ins are very similar in principle, differing only by the method of sending, which we will explain a bit later. These products are two of the 18 components contained in a larger product – MAPILab Toolbox.
For the sake of convenience, we will describe a common scenario with a monthly report containing an attachment, to be sent from Outlook 2013 on the first day of each month, with the recipient address and part of the filename unchanged between each occurrence.
Email Scheduler for Outlook
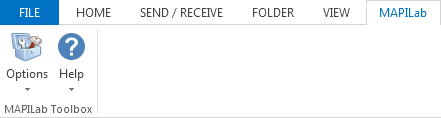
First, we are going to prepare our add-ins by loading them to Outlook. This has to be done for each component we are going to use. After installation, the new MAPILab Toolbox icon appears in the Outlook interface:
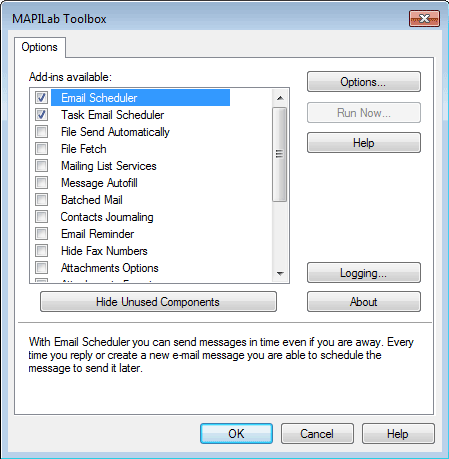
Simply click on the toolbox picture, and browse through the list of components, enabling the desired component by ticking its checkbox:
Once we click “Ok” and close the component list, we can now easily create recurring messages in Outlook 2013! Simply start composing an email from the “New Email” window, and use the new add-in button:
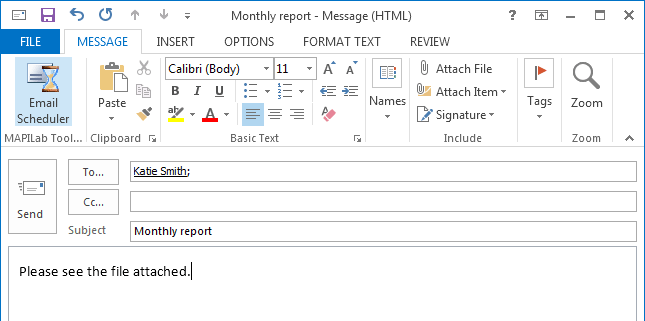
From here on, every new message you compose can be scheduled for repeat sending with a set recurrence interval. The recurrence options are available as soon as you click the “Email scheduler” button in the “New Email” window:
Note that you can create new scheduled messages, as well as browse through a list of all recurring message for easy editing via the MAPILab Toolbox settings: click on the toolbox picture, select a component, and click “Options”
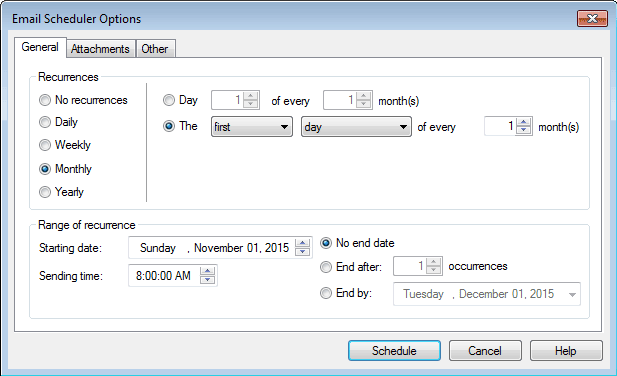
As you can see, by using this window, you can cover a virtually unlimited scope of scheduling options, from a single, non-recurring send to to completely automated mailings with the recurring send time specified down to the second. Since the recipient of this example expects to receive this report on the 1st day of every month, the schedule has been set accordingly.
We are also using an attachment in our recurring message, so let’s configure it by using the “Attachments” tab. While you can attach entire folders to your scheduled messages, for now we will use a single report file called “Report_112015.zip”. Note that such kind of monthly items tend to have different dates in their name from one sending to the next, but we have just the tool for the job, as Email Scheduler allows use of file masks! Here is how the resulting setting would look:
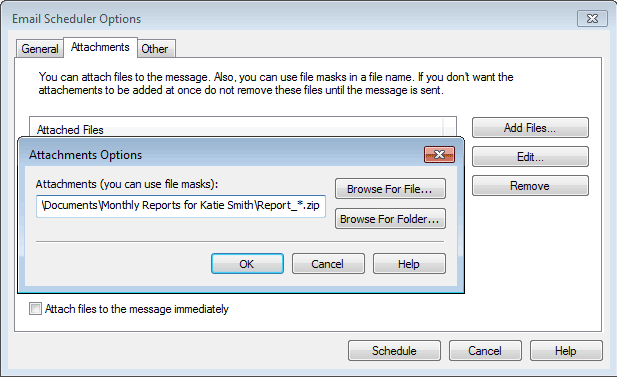
As the option on bottom of this tab implies, you can attach a file immediately during message creation, or – if you leave this checkbox unticked – merely designate it for future sending! This allows you to freely modify the contents of the file until the due date, when it will be attached and sent along with the scheduled message.
Also notice how the variable part of the filename is replaced with a mask (the actual filename is “Report_112015.zip”), which will basically tells the add-in to ignore any difference past the filename body itself, and attach the report files, even if they are renamed with different date stamps.
The last tab of the settings window called “Other” is worth noting:
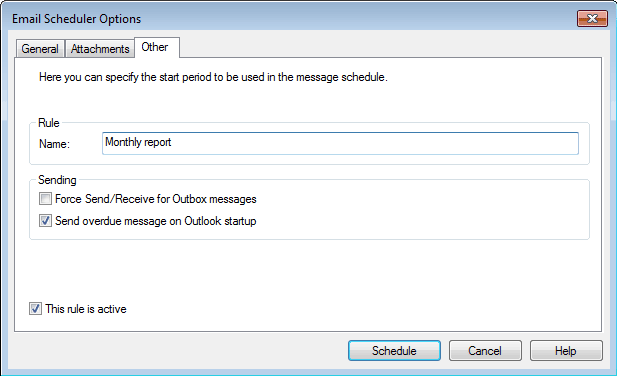
It was designed to introduce certain fail-safe measures to your recurring messages, such as to ignore the wait-for-input sending algorithms present in some user environments, for example, when the “Send immediately when connected” Outlook option is used. This prevents all messages from being sent right away by keeping them in the Outbox folder until the “Send” button is manually clicked.
Another option, “Send overdue message on Outlook startup”, addresses the platform-dependent nature of COM Add-ins, which requires Outlook to be running in order for their features to work. If you have accidentally closed Outlook during the scheduled sending date, the setting will automatically push the overdue message as fast as possible after Outlook starts, minimizing possible inconveniences.
After you have finished configuring your recurring message, it is time to click the “Schedule” button! From this moment, the message – instead of being pushed right away – is relocated to the add-in –specifically to a hidden location inside your mailbox, where it will wait for the due time to be automatically sent to the recipients you specified, with no further actions required from you. Just remember to keep Outlook running!
Task Email Scheduler for Outlook
Another way of achieving the recurring mail functionality is the second of these similar add-ins – Task Email Scheduler for Outlook. The main difference is that instead of moving the scheduled message to a hidden location until a due date, as Email Scheduler does, this one creates an Outlook Task linked to the scheduled message in the form of a task attachment, with the date and recurrence settings specified using native Outlook Task tools. It was designed specifically for users working with Outlook Tasks extensively, so that they can use a familiar interface and benefit from features such as sharing tasks between colleagues with collaborative editing, and synchronizing them with other devices, for example.
However, despite enabling certain exclusive features, the task-oriented Scheduler add-in also has minor disadvantages in comparison to the email-based one, such as no ability to include file masks for attachments.
Let’s move on to a quick tutorial on how to use it for recurring mail to demonstrate why the task-oriented interface can even serve users who are not too familiar with Outlook Tasks.
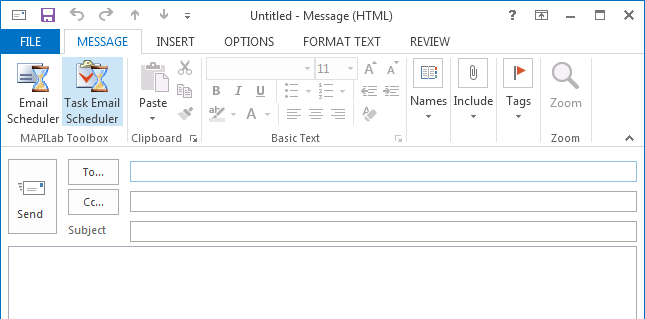
The add-in is activated just as before, by ticking its checkbox within the MAPILab Toolbox component list. After that, a new button is added to the “New Email” Window (you can have both Email Scheduler and Task Email Scheduler activated at the same time):
Upon composing your message and clicking it, a new window will open, which is basically a standard task creation interface:
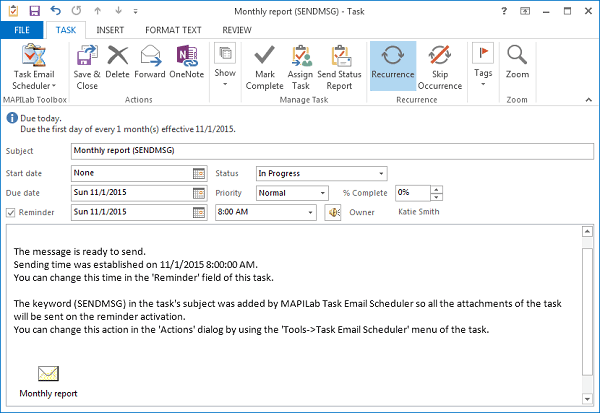
Notice how your email has been included as an attachment to task. This is the feature that allows collaborative editing – you can permit anyone from your workgroup to open this attachment and modify the source email message.
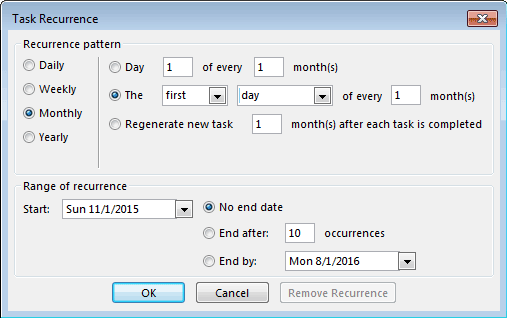
The recurrence options this time are located in the native Outlook 2013 interface for task creation, and are similar to those of the Email Scheduler:
After you click “Save & Close”, your recurring task is created in the Outlook Tasks list, and this is the last action required from you as a user to automate your recurring mailing!
We certainly hope that this article has improved your recurring mail composing skills! Stay tuned for more publications in our blog.


Both those options require Outlook to be up and running, don’t they? Any suggestion for scheduling a recurring email that would be sent even when Outlook is closed please?
Yes, our Email Scheduler add-in can function merely within Outlook, and it is able to send messages from Outlook only – while it is running in the online mode. We offer several tools for the Exchange Server – and mail server settings may provide such an option.
We use the Outlook toolbox. We are have in the template for a letter body, and are pulling in the date by %date%. Can I also pull in the time? I have tried %time% and failed… Thanks
There is no dedicated “Time” macro. You could modify the “Date” macro to also show time. In order to do that, please click the “Date Format” button and choose a date format which also contains the time variables (H, M, S).